In this tutorial, I’ll show you how you can develop an app that allows you to record list of addresses and view the address on the Google Maps. I will also show you how to view your current location on the Google Map. The coding will be done using MIT App Inventor.
What will be covered in this tutorial? In this tutorial, you’ll learn the basics of:
- List manipulation – creating lists, appending items to lists
- ListPicker – adding items to lists, persisting to database
- LocationSensor – detecting current location for displaying on Google Maps
- ActivityStarter – used to start-up Google Maps for current or predefined address
- Notifier – displaying messages
- TinyDB – persisting data (lists) into database
- Misc. – text manipulation, basic validation
We will be working toward the design shown in Figure-1 blow:

Figure-1
Figure-2 below is showing you, at high level, how the components are arranged in our design editor. It also shows you the non-visible components (e.g. TinyDb, ActivityStarter, LocationSensor, Notifier). that are used in the sample app. It also shows you the ListPicker. Please note that ListPicker can be dropped anywhere in the design editor because using the blocks, we set that hidden.

Figure-2
Assumption: This tutorial assumes you know the basics of App Inventor. For additional tutorials, please see HERE.
App Inventor Blocks
We define 2 global variables.
- tagAddress a variable is a constant and will be used, as a tag, for storing / retrieving data from our database.
- listLocations – a variable that be used to store / manipulate list of addresses
We now create a procedure that can be invoked when the app is started (initialized). The procedure sets up the initial state of some of the components. Some of these settings could have been done from the design editor, but for demo purpose and clarification, we are using a procedure. In the procedure, we also check our database to find out if there are any stored addresses. If no data, then we just use an empty list.

Figure-3
Viewing stored locations
We use a button, btnViewLocations, that user can tap to view all user-specified addresses in a ListPicker. If validation goes through (e.g. address list not empty), this button will invoke our ListPicker.Open to display the addresses. The ListPicker component has been set to not-visible (see our init procedure in top figure). The blocks for the clicked event of this button is shown below. When button is clicked, we check to see if our listLocations contains any data. If not, display error message, otherwise we open our ListPicker using ListPicker1.Open block:

Figure-4
Adding new addresses:
To add a new address, we have dropped a button (btnAddLocation ‘Add Location’). We also use a button (btnCancel ‘Cancel’) to cancel the process of adding. We also use a button btnAddLocatoinhelp ‘Location Help’) to display what type of addresses can be entered. The blocks looks like below:

Figure-5
When btnAddLocation is clicked, we make our address data entry visible (using screen arrangement), allowing user to enter address. If user clicks on cancel, we make the arrangement hidden again. Using this approach, we keep the screen simple and avoid the clutter. We also provide a button (btnSubmit ‘Submit’), allow user to indicate that they want to store data. The data entry arrangement looks like below:

Figure-6
When user taps on btnSubmit ‘Submit’ button, we perform basic validation to ensure data has been submitted. If validation does not pass, we display error message. Otherwise, we invoke a procedure that appends the new address to our list. We also store the updated list into our database. Once address is added, we hide our arrangement again. Blocks below shows how this logic is done:
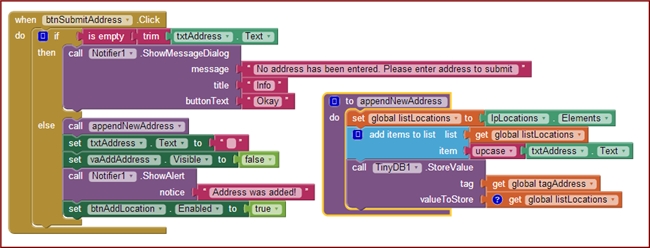
Figure-7
When user selects an address from the opened ListPicker, we display the address in the device and allow user to tap on btnViewMap ‘View on Map’ to see the selected address on the Google Map. Figure-8 shows the blocks for ListPicker.AfterPicking and Figure-9 shows how it is displayed on the device or emulator.

Figure-8

Figure-9
When the btnViewMap ‘View on Map’, we validate to ensure that an address already has been selected. If not, display error message otherwise we use blocks shown in Figure-10 to show address:

Figure-10
The above blocks will open the map and the output will be like image below:

Figure-11
Viewing current location on the map
We have dropped in a button, btnMyLocation ‘My location on the map’ that can be clicked to view current location on the map. It will use LocationSensor to get the current address and will use blocks shown in Figure-12 to show current location on the map:

Figure-12
Download source / apk


Mathias
December 2, 2018 at 4:37 pm
I tried MapIt, but I could not save data. After every new start of the app the addess list was empty – also after I installes the MapIt MIT version. What might have went wrong?
Hossein Amerkashi
December 2, 2018 at 5:30 pm
Did you use companion?
Create aok and test.
Tutorial and discussion at community.AppyBuilder.com
JMPG
June 23, 2020 at 3:06 am
Thanks you Hossein.
Jose Padilla Fromm Honduras
John Bates
December 17, 2017 at 10:03 am
I know this is a old topic but I am just now learning this. I have been playing with this and I am trying to figure out a way to remove list items one at a time by clicking remove and then selecting a item from the list picker to remove but everything I try returns a error saying it tried to remove 0 index. I am sure there is a way I just cannot come up with it. What make sense to me would be to call list picker open then set listLocations to listpicker elements then use remove list item list listlocations block with the index set to listpicker1 selection index but that don’t seem to work. Any help would greatly be appreciated. Thanks
Hossein Amerkashi
December 17, 2017 at 10:05 am
Please post technical questions to http://Community.AppyBuilder.com
Sedem Attah-Addo
November 6, 2017 at 10:09 am
Great Work.
Hossein Amerkashi
November 6, 2017 at 10:26 am
Checkout forum Community for discussions and tutorials at community.AppyBuilder.com
Robert Davis
March 25, 2017 at 9:18 pm
Thank you so much for this wonderful tutorial! Is there a way for me to send multiple addresses to the Google Map? I have made several attempts and just can’t seem to come up with the proper commands or syntax to get it to work? Ideally I would like to have the entire list of addresses displayed on the map at the same time.
Bakshi
November 13, 2016 at 7:49 am
I want to create app where i want to input the text and with click of button it should search directly from google!
Hossein Amerkashi
November 13, 2016 at 7:59 am
…then this post exactly shows you how to accomplish this.
Julita
January 12, 2016 at 6:42 am
Great tutorial! Now I’m looking to detect via GPS the people listed on my Tiny DB, and display their location on the map, how can I do it?
Joan Ig
November 4, 2015 at 6:56 pm
Thanks Hossein for the Map displaying Location program. I will try it and see how it goes.
My next question is about creating an app for a booking system. This app should allow me to book a room and show available rooms. If I book a room, it should show what is left to be booked.
Ryan
May 22, 2015 at 7:44 am
In the AppInventor Blocks – Figure 3, what is InitData??
Hossein Amerkashi
May 22, 2015 at 7:49 am
Its a custom Procedure block. You may want to get my book HERE: https://amerkashi.wordpress.com/
Itai
April 14, 2015 at 3:08 pm
Hi,
A little late, but still one issue here
I run the app on a LG phone with the USB option. when I push the see map button, the app open WAZE (navigation app) instead of Google map… any way I can force it to stick to Google map?
I guess it is related to this: android.intent.action.VIEWgeo:0,0?q=…
I tried to add set ActivityStarter1.ActivityPackage to com.google.android.apps.maps, but still it opens WAZE.
thank’s for the tutorial.
John Smith
February 26, 2015 at 12:26 am
Your How to develop location based Android App post is simply great.
Hossein Amerkashi
February 26, 2015 at 11:29 am
Thanks John
tafman
February 12, 2015 at 9:14 am
Thanks Mr Hossein for such a great app.how would i make this app use coordinates(longitude n lattitude) rather than using the adress. doing a project where i received GPS data as a text and i need an app which will show the map of these points
Robert
January 4, 2015 at 3:42 pm
Great tutorial! Could you please explain how to remove 1 item from the DB and list by clicking a Remove button, please? I can’t find it in the documentation or on the internet.
Robert
January 4, 2015 at 3:47 pm
Sorry, First i’ll read your link: List & List Manipulation
gamze
November 9, 2014 at 6:24 am
please help me! I am running this program in my phone it works just fine but when I run it on my tablet I can not get my current location. It is the same in every app which has gps. What can cause this problem?
M. Hossein Amerkashi
November 9, 2014 at 7:50 am
It should work the same behavior if the device has GPS, otherwise check the logcat
Cherif
October 26, 2014 at 8:44 am
Thank you Hossein! – I really learnt a lot. How would I implement storing multiple co-ordinates and searching if my current location is within 200m near any of the stored places? regards Cherif
DaltonSpider
October 23, 2014 at 8:13 pm
So good blog! How do I get the coordinates through a server with an ip and port and display the map in my app? (looks like the “ORANGE GPS app” that tracks vehicles)
Thanks Hossein!
Viraj
July 13, 2014 at 1:31 pm
Hello Hossein,
I used your tutorial to for learning android maps view it was great but you have to make onlyone change in this i.e. please add a block call ActivityStarter1.StartActivity in else part of when viewonmapbutton.click before call showmap block. Otherwise everything was good.
harry
July 9, 2014 at 8:46 am
Hi Hossein, how to change the button colors or marker setting in google map using app inventor ? I am new to app inventor
centroovblog
June 4, 2014 at 4:12 pm
Great tutorial. All ok!
Elvio from Italy
Peter Gebauer
May 13, 2014 at 4:33 pm
“Map It”
Unfortunately, the addresses are who you see below the app is deleted!
When you restart the Map It as no addresses!
M. Hossein Amerkashi
May 13, 2014 at 4:41 pm
You probably are using emulator. Run on actual device and you will be okay
Dwayne Kilgore
April 30, 2014 at 3:00 pm
Great tutorial. I am looking to create an almost similar app using App Inventor that has static data that I need to search (i.e.: static information on products we sell – i.e.: widget – Something we use to assemble with). I’ll use yours as an example but if you have a better example of searching a static database feel free to e-mail me. Again, great job!
Brawlius
April 20, 2014 at 10:45 am
Greetings Dear!
I am Brazilian and I found your blog, I really enjoyed, of course I use the google translator, including to contact you now.
My question is: how do I see the source code (those type of eclipse (java).), It has some things I would give my personal touch programming, falram me you have a plugin for netebeans …
Answer me by email.
Grateful.
Neto Amparo
M. Hossein Amerkashi
April 20, 2014 at 11:54 am
The source is NOT in Java, but in App Inventor.
You’ll find the source (.aia) at the bottom of the blog
RauL
March 31, 2014 at 1:54 am
How can i download this project (*.aia)?
can you send it to my email please?
M. Hossein Amerkashi
March 31, 2014 at 7:01 am
Check the bottom of the blog post. You’ll find both executable (.apk) and the source (.aia).
-Hossein.